You can start a project with a single line item: a Trimble OEM board tucked into a tiny frame, and suddenly the question becomes less about if you can get centimeter-grade positioning and more about how and how small, light, and cool you can keep it.
Why Choosing the Right Compact Board Matters for Trimble OEM Builds
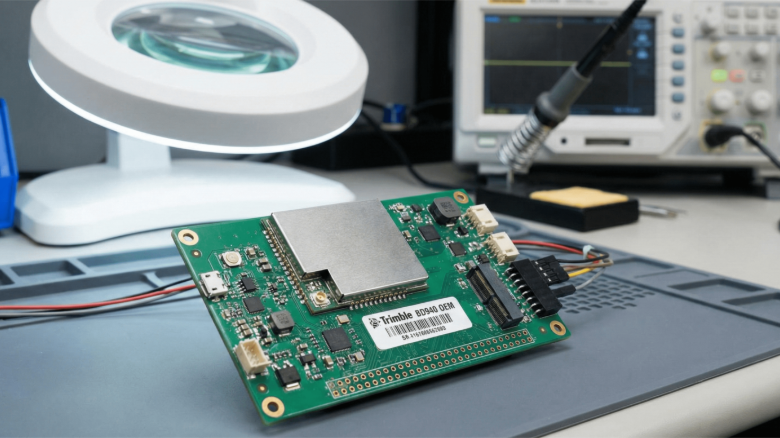
If you’re integrating a Trimble OEM receiver into a drone, you’re buying into a set of trade-offs: accuracy and features versus size, weight, and power (SWaP). The BD940 family, a common choice for compact UAVs, is designed specifically for small footprints, offering a solder-down module that packs multi-constellation, multi-frequency GNSS into a 51 × 41 × 7 mm package. That tiny envelope changes mounting, cooling, and cabling decisions compared with a full-sized board.
Designing for Swap: Layout and Power Choices
When you plan the stack around a Trimble OEM module, start by budgeting volume and watts before you pick sensors or batteries. The BD940 typically weighs measured grams and draws roughly between ~1.7 W to ~2.2 W, depending on constellation load, which is small but meaningful on a micro-UAV where every watt shortens flight time. Put the GNSS board on a short list of “non-negotiables” for placement: it needs a clear sky view, low RF noise, and reliable power rails. If you minimize cable length and avoid multiple voltage conversions near the module, you cut heat and electrical noise while preserving battery life.
Heat Dissipation Strategies
Heat is the invisible enemy in compact UAV design. Even a couple of watts from a Trimble OEM board adds up in a closed carbon-fiber fuselage. The easiest wins are mechanical: give the module a small thermal path to a chassis mounting point (a thermal pad or copper spacer), place it near a thin metal patch that can radiate heat, and avoid sandwiching it between punishingly hot components like high-current ESCs. Consider airflow channels, even passive venting, or a tiny, low-RPM blower can drop the die temperature several degrees and improve GNSS and IMU longevity. Trimble’s product guides also list operating-temperature ranges and mechanical outlines you should follow when designing mounting bosses and shielding.
Antenna Placement and RF Clarity
No amount of clever filtering compensates for a blocked antenna. When integrating a Trimble OEM solution, treat the antenna as a separate system-level decision: locate it on the highest possible plane, far from carbon structures, and maintain an unobstructed sky-mask above roughly 30° where possible. For small UAS, dual-antenna setups improve heading and reliability, but they require more careful physical separation and wiring. Follow recognized GNSS antenna placement guides for best results, which spell out sky visibility, multipath avoidance, and minimum clearances that directly affect RTK and PPP performance.
Cabling, EMI, and Practical Wiring
Cabling choices are simple ways to save headaches. Use short, shielded pigtails for antenna runs and route them away from high-current traces; soldered, right-angle connectors can reduce strain and weight compared with bulky N-type adapters. For power, prefer a clean, regulated supply close to the Trimble OEM module to avoid voltage sag under load; add a small ferrite or LC filter if motors or radios introduce noise. Grounding strategy matters: tie the module’s shield to the chassis at one point to avoid ground loops, and avoid running data cables parallel to motor power leads. These small wiring habits pay back in stable RTK fixes and fewer intermittent dropouts during missions.
Mechanical Integration: Mounting, Shielding, and Serviceability
Think like a mechanic: design for removal. Use low-profile standoffs so you can replace a Trimble OEM board without unpicking the entire frame. A thin shield or can may be helpful for EMI and ESD protection, but ensure the shield doesn’t trap heat. If certification or emissions testing is on your roadmap, pick materials and mounting layouts that minimize radiated emissions. Trimble modules are engineered to reduce emissions, but your wiring and antenna choices can create surprises at test time. Datasheets and EMI notes from manufacturers will flag typical emissions behavior and connector pinouts you’ll need for compliance work.
Testing, Field Validation, and Regulatory Realities
Don’t let lab success fool you: field testing is where integration meets reality. Validate your Trimble OEM installation across altitudes, operating orientations, and in representative RF environments. Log raw GNSS and IMU streams so you can replay failures and correlate them to motor RPMs, radio bursts, or thermal events. Also, keep one eye on regulations: if you plan commercial flights, FAA guidance and advisory circulars outline operational requirements and safety practices for small UAS that inform how you must document testing and risk mitigations. Consider the FAA’s Remote Pilot guidance and sUAS advisory circulars as baseline reading for operations and compliance.
A Few Final Integrator-Friendly Rules of Thumb for OEM Projects
- Assume the GNSS antenna is the most important single component for accuracy; treat it like a mission-critical payload. OEMs perform best when antennas get full-sky exposure.
- Minimize cable length and connector count: every connector adds weight, loss, and potential failure.
- Budget 10–15% of your mass and power estimates for thermal solutions small fans, pads, or heatsinks repay themselves in reliability.
- Log aggressively in initial flights; raw logs are the quickest path from mysterious dropouts to root cause.
Integrating a Trimble OEM board into a compact UAV is equal parts mechanical puzzle, electrical engineering, and real-world testing. The module’s small size and robust GNSS performance let you build lighter, more capable systems, but only if you respect the little details: antenna sightlines, thermal escape routes, and clean wiring. Do those, and that tiny board will transform a cramped airframe into a precise mapping or inspection tool that punches well above its weight.
Treat the Trimble OEM element as the nervous system of your drone, small, delicate, and utterly central to mission success. Design around its needs early, validate in the field, and the payoff is a compact UAV that reliably delivers high-accuracy positioning without carrying unnecessary bulk.